Tag Archives: infant care

Baby’s Head Shape: Flat Spots, Torticollis & Plagio

Does your baby have a flat spot on the back of his head? Many babies do. Fortunately, most flat spots, called Positional Plagiocephaly, are mild and need no treatment other than positioning changes and monitoring. Learn how to prevent and treat flattening of your baby’s head, and when to speak with your pediatrician about concerns.

 What is Deformational Plagiocephaly or “Flat Head”?
Also called Positional Plagiocephaly, Deformational Plagio refers to the misshapen or asymmetric shape of the head. The flat spot is usually on the back of the baby’s head, though in some cases, for example, with torticollis, the flat area may be on one side of the skull.

What causes deformational plagiocephaly or “Flat Head”?
The most common cause of deformational plagiocephaly is positional. A newborn’s skull is soft and designed to grow quickly. When babies rest in one position for long periods of time, the skull begins to flatten from the external pressure against it. Since babies can spend a lot of time in the “passive recline position” (car seats, bouncer seats, swings, back-to-sleep position), it’s possible for a flat area to develop. Once a flattening occurs, it’s easier for the head to “resettle” there each time, allowing other parts of the skull to grow but not the flat area.

Shifting your newborn’s sleeping and resting positions is the best prevention for developing a flat spot. During diaper changes and for sleep, try alternating his “head and feet” position, reversing the way you usually lay your baby on his back. When your baby is awake and observed, use more tummy time and side-lying positions. Lots of awake tummy time with encouragement will also help by strengthening the neck, shoulder and arm muscles, which will eventually help your baby shift his own positions. Carrying, holding or “wearing” your baby without pressure on the back of his head will also encourage muscle development and prevents pressure against the flat spot.

Is a Bald Spot or stripe on the back of the head cause for concern?
No. It’s common for babies between 4 – 7 months to “wear away” an area of hair from turning their head side to side when in car seats, bouncer seats or sleeping on the back. This bald patch is normal and if not accompanied by significant skull flattening, is not a cause for worry. Bald patches tend to resolve between 9 to 12 months, as your baby will be sitting, crawling and moving more, spending less time on his back, allowing hair time to fill in again. Many fashionable babies sport a fine mullet.

Torticollis and Flat Head – 
A common cause of deformational plagiocephaly is muscular torticollis. Muscular torticollis (sometimes called “wry neck”) is a tightening of specific neck muscles, which prevent full motion and keep the baby’s head slightly tilted or turned to the side. Because torticollis causes the baby to keep his head at a specific angle, a flat spot may form as the baby’s head rests against the mattress or seat at the same position for repeated periods of time, leading to positional plagiocephaly.

Torticollis is often missed by parents and health care providers, since newborns have short necks and tend to lean or “slump” to one or another side. Make sure your baby is an “equal opportunity slumper” – sometimes leaning to the right side and other times the left, when sleeping, and check that your baby can turn his head equally to both sides. If you’re concerned about your baby’s persistent head-tilt or suspect restricted neck motion, speak to your pediatrician.

Treating Torticollis – for a baby with torticollis, treating the tightened muscles early is important to achieve full head movement as baby grows. Full motion of the head and neck helps with balance as well as the physical appearance of the head shape (and sometimes facial symmetry). Torticollis is best treated early, during your baby’s first several months of life when specific stretching and repositioning techniques are most effective. Your pediatrician may refer you to a pediatric physical therapist to learn specific stretching exercises and positioning tips for your baby’s particular needs.

What about Helmets?
Maybe you’ve seen a baby out in the store or mall wearing what seems like an infant-sized football helmet. This is a therapeutic device called a Cranial Band or Orthotic, worn to help correct a misshaped head.  In more severe Plagio, when flattening or asymmetry is significant and beginning to affect facial appearance (one eye or ear may begin to move out of line with the face), or, in situations where a baby was born very prematurely or has early closure of the skull bones, an Orthotic may be recommended. Made by a specialist, baby helmets are very lightweight, with a hard outer shell and foam lining. Very gentle pressure restricts growth in some areas while allowing the skull to “fill out” and freely grow around the flattened areas, rounding out the head. Helmet therapy typically takes 3 to 6 months with good results.  Babies generally adjust to wearing a helmet quickly – it’s harder on the parents usually due to comments from well-meaning strangers and additional appointments. But remember that mild flattening is common and usually doesn’t require treatment with a helmet.
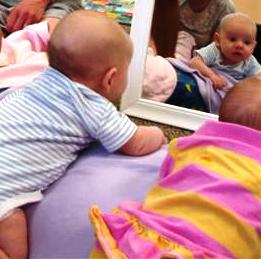

 

Tummy Time Success!

A bolster, a mirror: "Hey, look at that cute baby!"
A bolster, a mirror: “Hey, look at that cute baby!”

Supervised short periods when baby is placed on her belly while awake, called Tummy Time, may seem more like a struggle than a play time. Why is tummy time so important, and what can you do to encourage a baby’s participation?

  1. The main goal of tummy time is neck, shoulder and arm strengthening. This is the beginning of head control and upper trunk and balance development needed for sitting and standing.
    Help your baby by positioning her arms so she can use her forearms to press against and lift her neck. Even if she just brings her head up for a few seconds then rests it back down, she’s beginning to develop those (Sternocleidomastoid) muscles.
  2. Propped positions may work better. Many babies who fuss during tummy time on a flat surface do much better in a propped position. Try tightly rolling a blanket or towel into a firm bolster, then position baby in a kneeling position with her tummy right up the bolster, and with arms tucked up at chest level. This way she’ll have some leverage and will use her arm and shoulder muscles to push with, and be able to raise her head. You may need to reposition your baby’s arms often if she tends to bring her arms by her side and “swim”, or slides down the bolster.

  3. Engage and distract! Tummy time is a partnership activity. Encourage and tempt your baby to lift her head to see what’s going on. Use a favorite board book, rattle or toy to capture her attention and experiment with different locations for tummy time both indoors and out. Child-safe mirrors are great – who wouldn’t want to look at that beautiful baby?
  4. Brief but frequent. Instead of thinking of tummy time as a daily 15 minutes to endure, place your awake baby on her tummy for shorter sessions throughout the day, and don’t let baby get too distressed. Just like going to the gym, it’s the frequent and regular exercise that begins to build muscle strength, which eventually will make tummy time sessions much easier for your baby, and therefore, for you!
  5. Watch your baby progress! At one month, expect some brief head lifting or bobbing, at two months, her head may be held up for longer periods. Around three months, expect to see her support herself on bent arms during tummy time and at four to five months, baby may be able to push up higher, keeping shoulders and upper chest off the surface. All this prepares your baby for trunk control and tripod sitting around five to six months!

Tummy Time FAQs

My two month old really hates tummy time. We try every day but I quickly “rescue” her because she’s fussing. Should I continue or wait a few weeks and start over?

Continue, but for brief periods that (hopefully) remain mostly positive experiences. Because infants tend to spend most of their time in reclined positions like a car seat, swing or bassinet, they aren’t often encouraged to “work on” those arm/shoulder/neck muscles. Also, the passive recline position puts pressure on the back of the baby’s head, which can lead to flat spots. Vary your baby’s position many times throughout the day, and keep tummy time one of the positions in regular rotation. Hopefully the tips shared above will help her tolerate the brief sessions better and as she builds more upper body strength, it will become less of a challenge for both of you.

When do we stop doing tummy time? My 5 month old just flips right over onto his back. Can we stop now?

Congratulations! Tummy time doesn’t really go away, it just evolves into “Floor Time”. It sounds like your baby is learning how to maneuver his body and will soon be moving around more. Place your baby (on his tummy) on a clean and safe floor area a few times each day, so he can work on learning to roll and explore. When he rolls over onto his back, place some interesting toys near him just barely out of reach and soon he will work on pivoting around or rolling back onto his tummy to explore what’s around him. Because babies often move backwards before they learn to creep forward, reduce frustration by putting several toys around him in a circle so whatever direction he ends up in, there’s a reward nearby. Floor time is just as essential as tummy time, and is the best place for baby to develop his gross motor (body movement) and fine motor (hand-eye coordination) skills.

Changing Table Activities

Changing Table Activities – Soon a favorite part of your baby’s routine!

"Hey, Let's Play!"
“Hey, Let’s Play!”

Changing Table Activities don’t involve diapers – they’re little games to build into your  baby’s daily routine.  During a diaper change, your face is the perfect visual distance from your baby, and she can see your facial expressions more clearly. Take the opportunity to “narrate” your activities and talk throughout during the diapering process. Once your baby is through the early newborn phase and stops crying during most diaper changes, chances are good that she’ll soon decide the changing table is a favorite place to play!

What are Changing Table Activities?
The few minutes of positive interaction, play and pleasant bonding time that occur before, during or after your baby’s diaper changes. They don’t involve the diapers and wipes, and don’t even require a changing table!

Build several fun little songs and simple play activities into your baby’s routine. Babies love repetition, so by using the same few rhyming games, she’ll soon recognize the activity, becoming more excited and engaged. Together you’ll begin to have special “favorite” songs and games to share.

Don’t think you know any nursery rhymes or baby games? Bet you do!
“Row, Row, Row Your Boat” with rocking movements
Cross baby’s legs one over the other, then flex them up toward her body so the legs are closer to her belly. Sing one verse of the song while slowly rocking your baby gently from side to side. Allow her legs to relax and unfold down, reverse the crossed legs so the other foot is on top now, and bring the legs back up, and sing the song again while gently rocking your baby side to side. This is also helpful for gassy babies (which are most babies!).
Even if not fitting the traditional “Nursery Rhyme” category, in a pinch, you can sing Jingle Bells, Happy Birthday, the Alphabet Song and Row Your Boat. Your baby will be thrilled as you make up little pats or bounces to go along with your song, for example, try gently “clapping” baby’s feet together in rhythm to the song.

Maybe you also remember The Itsy Bitsy Spider, Twinkle Twinkle Little Star, or This Little Piggy Went to Market. These old standards even have easy hand movements built in. Also incorporate any songs or rhymes you remember from your childhood, especially if they are in a different language, and lyrics from favorite bands. Your baby will love them all if you’re singing them.

Because you’ll need to stay in hand’s distance from your baby at all times when on the changing table, use a nearby shelf to store a few playful items to explore with your baby to extend the playtime. A rattle, a board book, a brightly colored puppet or stuffed animal and a baby-safe mirror are some items that you might use to engage your infant. When singing or reading to your baby, use a high-pitched, sing-song tone of voice. Often called “Motherese” or “Parentese”, as annoying as it may be to adults, it’s been shown by research to be significantly better at holding a baby’s interest.


Fine Motor Development for Babies

"She started with the pair of links - and now has graduated to the Winkel!"
“She started with the pair of links – and now has graduated to the Winkel!”

How babies find and use their hands
A baby’s grasp is reflexive, and most young babies keep their hands tightly fisted, or curled closed, when they are awake and alert. You’ll notice your baby’s fists soften and open slightly when they are relaxed, such as halfway into a feeding or asleep.

Even though their fists are closed, the grasp reflex is present. When a baby feels something on their palm, he’ll usually respond by curling his fingers and holding on. By offering appropriate objects in an intentional way, you can help your baby become more aware of their hands and arms, and explore the movements and coordination leading to hand and arm control. The increasing voluntary control of the hands and fingers is called “Fine Motor Development”. (“Gross Motor Development” are bigger body movements like sitting and pulling to a stand – Learn more about How Babies Develop)

You can help your young baby build increasing awareness of their hands and work on developing more voluntary control over the movements of arms and hands by taking advantage of the grasp reflex.

Baby’s first “toy” – Just a pair of links.

Take two simple baby toy “links”, clicked together, and place them in your baby’s palm. If his fist is closed tightly, try tapping on the small part of your baby’s exposed palm below the curled fingers. The fingers will quickly relax then tighten again. Take that moment to gently unfold his fingers to place the link in his palm, then loop it over his fingers. This way, his thumb will serve as a hook to help keep the links in his hand even if his hand opens and closes several times over the playtime.

Once your baby is holding the pair of links, he’ll randomly move arms and hands, and when doing so, the links will gently click and clack. Over time, your baby will begin to move his arms and hands more, and will also bring his hand up to the mouth. As soon as a baby can deliberately bring hands toward the mouth, he will: this isn’t necessarily a sign of hunger or an emerging tooth. It’s a very normal developmental behavior that means “Awesome! I can get my hands in my mouth now! Nom Nom!” Your baby will mouth his hands and fingers, and any portion of the links that he can bring to his mouth.

Try “playing” with the links each day. You’ll probably notice that your baby begins to seem more aware of his hands when he’s holding the links and begins to move them with more intention.

ALSO: Add additional links to the toys that dangle down from your baby’s playmat arches so that his still-very-random arm and leg movements can connect with the toy. Bring the toys down to where your baby’s natural movements happen to be. Your baby may not be able to reach out and grab at the toys dangling over him for a while yet, but if the toys are dangling close to their hands, they will become much more interested and engaged.

Often babies will flail out with an arm or hand and hit a toy over and over, making it rattle and move, while looking off in a completely different direction. Just because he’s not looking, doesn’t mean he’s not working hard to figure out how to move his body to connect with the toy. ALSO moving his head, and the cognitive steps of his understanding what he’s seeing (wow, that’s my arm, with my hand, hitting that toy, which is making that noise) is still a whole lot of information to process. If he’s swiping out with his arm to connect with a toy over and over, he’s showing you a new purposeful skill even if he’s not looking.

Texture Exploration: let your baby feel different types of textures by helping him stroke his hand or fingers over things. Touch soft, hard, shiny, fluffy, warm, cool, crunchy, velvety, scratchy textures, and verbally describe for her what it feels like (called “narrating your activities”).

– Good early/first “toys” (you’re doing most of the work) – the simple pair of links. Other perfect early toys include soft fabric books, crunchy and crinkly toys and fabrics, and easy grasp rattles that are lightweight, easy to hold and easy to clean.

What comes next? You’ll begin to see one hand to the mouth more and more often by three months. Watch to see if your baby brings hands together to midline (the center of the body) when in the carseat or sitting upright. Usually by three months, your baby will be interested in grasping and clutching his own hands together, and by four months, will be working very hard at getting both hands in the mouth at the same time. He’s got to make room in there, because around five or six months, he’ll be trying to bring his foot into his mouth. Really! Fun times ahead.

A portion of this article appeared on the Baby+Co blog