All posts by Nancy Holtzman

Links and such

(This may look like a random collection of links to most. That’s ok, feel free to click and enjoy)

five babies on bolsters

History, Legacy, Feel-Good Stuff:
Great Beginnings New Mothers Groups. My Legacy. Begun in West Roxbury, 1995. Ended in 2014, after reaching 25,000 families in five states and thirteen locations. The curriculum is continued in a variety of community centers, childcare programs, birth centers and parenting programs nationally.  See the experiences of some original Isis participants. 

Magic Beans says a thoughtful Goodbye to Isis Parenting and Nancy

The Atlantic covers the MIT Program Building a Better Breastpump 

Boston Globe’s thoughts on  What Happened to Isis. (they only get it half-right, but it’s still nice)

Journal of Obstetric, GYN and Neonatal Nursing (JOGNN) free access to my publication abstract on Early Parenting and Sleep.

AWHONN (Association of Women’s Health, Obstetric and Neonatal Nurses) see my  Super Cool Sleep Poster presentation on supporting parents around infant sleep.

Links Related to Topics Discussed

Go on, take a bath together! Newborn Co-Bathing is a thing if your baby hates the baby tub.

Brief Pump, Store and Feed Careplan may be useful. More on this later.

Breastfeeding Webinar Five Tips for Better Pumping with info about why I recommend pumping after breastfeeding, not mid-way between feeds.

How to Nurse Sidelying  and on both sides!  Best tweaked in person – remind me.

Soon less crying, more playing on the Changing Table! I promise!

Cradle Cap from Mayo Clinic (a trustworthy clinical source for parents IMO) – we can discuss if you want to use Head’n’Shoulders ( if pedi-approved)  and get rid of it in a week, or nothing or jojoba or coconut oil and get rid of it in 1-2 months. Either way works.

How to SAVE a Baby’s LIFE –  INFANT CPR ! Watch this 3 min. video. Also, a 2 minute choke-saving skills video review. Let’s review both of these important skills!

For S.: my favorite Infant Massage music – the original House at Pooh Corner.  We also talked about Tummy Massage for Gas.


Verify Credentials:  RN CPN IBCLC

RN: View my Registered Nursing License here, current and in good standing since 1989.  That’s 30 years if you are sleep deprived 😉 Check credentials.

CPN: View my Board Certification for Pediatric Nursing here, an advanced credential held for a decade and recertified every two years. View verification

IBCLC: International Board Certified Lactation Consultant – in continuous practice  since 1998. Yes, I have been a BOARD CERTIFIED feeding specialist for over 20 years, learning more each week from every mom and baby I meet. Verify IBCLC credential

Tummy Time Success!

A bolster, a mirror: "Hey, look at that cute baby!"
A bolster, a mirror: “Hey, look at that cute baby!”

Supervised short periods when baby is placed on her belly while awake, called Tummy Time, may seem more like a struggle than a play time. Why is tummy time so important, and what can you do to encourage a baby’s participation?

  1. The main goal of tummy time is neck, shoulder and arm strengthening. This is the beginning of head control and upper trunk and balance development needed for sitting and standing.
    Help your baby by positioning her arms so she can use her forearms to press against and lift her neck. Even if she just brings her head up for a few seconds then rests it back down, she’s beginning to develop those (Sternocleidomastoid) muscles.
  2. Propped positions may work better. Many babies who fuss during tummy time on a flat surface do much better in a propped position. Try tightly rolling a blanket or towel into a firm bolster, then position baby in a kneeling position with her tummy right up the bolster, and with arms tucked up at chest level. This way she’ll have some leverage and will use her arm and shoulder muscles to push with, and be able to raise her head. You may need to reposition your baby’s arms often if she tends to bring her arms by her side and “swim”, or slides down the bolster.

  3. Engage and distract! Tummy time is a partnership activity. Encourage and tempt your baby to lift her head to see what’s going on. Use a favorite board book, rattle or toy to capture her attention and experiment with different locations for tummy time both indoors and out. Child-safe mirrors are great – who wouldn’t want to look at that beautiful baby?
  4. Brief but frequent. Instead of thinking of tummy time as a daily 15 minutes to endure, place your awake baby on her tummy for shorter sessions throughout the day, and don’t let baby get too distressed. Just like going to the gym, it’s the frequent and regular exercise that begins to build muscle strength, which eventually will make tummy time sessions much easier for your baby, and therefore, for you!
  5. Watch your baby progress! At one month, expect some brief head lifting or bobbing, at two months, her head may be held up for longer periods. Around three months, expect to see her support herself on bent arms during tummy time and at four to five months, baby may be able to push up higher, keeping shoulders and upper chest off the surface. All this prepares your baby for trunk control and tripod sitting around five to six months!

Tummy Time FAQs

My two month old really hates tummy time. We try every day but I quickly “rescue” her because she’s fussing. Should I continue or wait a few weeks and start over?

Continue, but for brief periods that (hopefully) remain mostly positive experiences. Because infants tend to spend most of their time in reclined positions like a car seat, swing or bassinet, they aren’t often encouraged to “work on” those arm/shoulder/neck muscles. Also, the passive recline position puts pressure on the back of the baby’s head, which can lead to flat spots. Vary your baby’s position many times throughout the day, and keep tummy time one of the positions in regular rotation. Hopefully the tips shared above will help her tolerate the brief sessions better and as she builds more upper body strength, it will become less of a challenge for both of you.

When do we stop doing tummy time? My 5 month old just flips right over onto his back. Can we stop now?

Congratulations! Tummy time doesn’t really go away, it just evolves into “Floor Time”. It sounds like your baby is learning how to maneuver his body and will soon be moving around more. Place your baby (on his tummy) on a clean and safe floor area a few times each day, so he can work on learning to roll and explore. When he rolls over onto his back, place some interesting toys near him just barely out of reach and soon he will work on pivoting around or rolling back onto his tummy to explore what’s around him. Because babies often move backwards before they learn to creep forward, reduce frustration by putting several toys around him in a circle so whatever direction he ends up in, there’s a reward nearby. Floor time is just as essential as tummy time, and is the best place for baby to develop his gross motor (body movement) and fine motor (hand-eye coordination) skills.

Changing Table Activities

Changing Table Activities – Soon a favorite part of your baby’s routine!

"Hey, Let's Play!"
“Hey, Let’s Play!”

Changing Table Activities don’t involve diapers – they’re little games to build into your  baby’s daily routine.  During a diaper change, your face is the perfect visual distance from your baby, and she can see your facial expressions more clearly. Take the opportunity to “narrate” your activities and talk throughout during the diapering process. Once your baby is through the early newborn phase and stops crying during most diaper changes, chances are good that she’ll soon decide the changing table is a favorite place to play!

What are Changing Table Activities?
The few minutes of positive interaction, play and pleasant bonding time that occur before, during or after your baby’s diaper changes. They don’t involve the diapers and wipes, and don’t even require a changing table!

Build several fun little songs and simple play activities into your baby’s routine. Babies love repetition, so by using the same few rhyming games, she’ll soon recognize the activity, becoming more excited and engaged. Together you’ll begin to have special “favorite” songs and games to share.

Don’t think you know any nursery rhymes or baby games? Bet you do!
“Row, Row, Row Your Boat” with rocking movements
Cross baby’s legs one over the other, then flex them up toward her body so the legs are closer to her belly. Sing one verse of the song while slowly rocking your baby gently from side to side. Allow her legs to relax and unfold down, reverse the crossed legs so the other foot is on top now, and bring the legs back up, and sing the song again while gently rocking your baby side to side. This is also helpful for gassy babies (which are most babies!).
Even if not fitting the traditional “Nursery Rhyme” category, in a pinch, you can sing Jingle Bells, Happy Birthday, the Alphabet Song and Row Your Boat. Your baby will be thrilled as you make up little pats or bounces to go along with your song, for example, try gently “clapping” baby’s feet together in rhythm to the song.

Maybe you also remember The Itsy Bitsy Spider, Twinkle Twinkle Little Star, or This Little Piggy Went to Market. These old standards even have easy hand movements built in. Also incorporate any songs or rhymes you remember from your childhood, especially if they are in a different language, and lyrics from favorite bands. Your baby will love them all if you’re singing them.

Because you’ll need to stay in hand’s distance from your baby at all times when on the changing table, use a nearby shelf to store a few playful items to explore with your baby to extend the playtime. A rattle, a board book, a brightly colored puppet or stuffed animal and a baby-safe mirror are some items that you might use to engage your infant. When singing or reading to your baby, use a high-pitched, sing-song tone of voice. Often called “Motherese” or “Parentese”, as annoying as it may be to adults, it’s been shown by research to be significantly better at holding a baby’s interest.


Introducing Solids: Traditional Methods and Alternatives

Introducing Solid Foods, Part 2gerber

The “traditional” method of introducing solid foods has been around for decades: spoon feeding single-ingredient, pureed “baby foods” and gradually increasing variety and texture as baby becomes older.
As we discussed in part one, the “Traditional” method of introducing foods to infants in the US is actually unsupported and increasingly contradicted by research, and may be gradually falling out of favor. Even so, most pediatricians and baby books still recommend a slow and careful introduction of spoon-feeding specific pureed foods and avoiding others.

The “Feed Baby Almost Anything” Method
Several alternatives to the “traditional” method exist. One option is to continue to offer pureed or modified table foods but introduce a much wider variety of food types and flavors (including egg, fish, wheat and combination foods) sooner. Earlier exposure to these foods, rather than avoiding them, may actually help reduce the risk of allergy and celiac disease. Dairy foods and protein foods (pureed meat) are also offered much earlier than in the traditional method. Check with your pediatrician for specific advice.

Baby-Led Weaning (or, Baby Self-Feeding)
Another option rising in popularity is called “Baby-Led Weaning”. I’d prefer to call it “Baby Self-Feeding” because here in the US, “weaning” commonly refers to the reduction or stopping of breastfeeding. In Europe, where Baby-Led Weaning first became popular, “weaning” refers to the introduction of solid foods. This method is all about allowing a baby to explore food on her own terms and gradually learn to chew and swallow. Spoon-feeding purees are not used, and the saying “Food Before One is Just for Fun” narrates the attitude that the amount of food the baby eats may be minimal, and that’s ok. We’ll talk more about “finger foods” vs Baby-Led Weaning/Baby-Self Feeding in Part 3.

Traditional Method of Introducing Purees:
If using this method, it is common to first introduce a cereal, then an orange vegetable, a green vegetable, and then a fruit. Then, simply alternate remaining single-ingredient fruits and vegetables one by one, adding one new food every few days until all of the following have been introduced. This should take several weeks or a month. Remember, there’s no rush or reason to push. These foods aren’t particularly nutritious, are less caloric than your baby’s milk, and won’t help your baby sleep longer: in fact, feeding too close to bedtime can cause gas and digestive upset.

Cereals, Iron-Fortified: Oatmeal, barley cereal, brown rice cereal, mixed with breastmilk, formula (if already introduced) or water.
Vegetables: Carrots, sweet potatoes, winter squash, peas, green beans, beets.
Fruits: Applesauce, peaches, pears, apricots, plums/prunes, bananas, avocado.

Continue to offer cereal at each meal, along with the fruit and/or vegetable. Cereal is the bulk and the main calorie source of the “meal”. The vegetables and fruits are fairly low in calorie and high in water. Peas, bananas, avocado, sweet potato are about twice as caloric than green beans, carrots, winter squash, applesauce, peaches, pears.

Remember that your baby’s milk source is still their primary source of nutrition and is a complete food, and in fact is more caloric and nutritious than these “solid foods” you’re offering. 4 ounces of breastmilk contains about 100 calories and the perfect mix of fats, proteins, vitamins and minerals for your baby to grow. 4 ounces of applesauce or pureed carrots contains less than half the calories of breastmilk or formula, and only trace nutrients.

Try to avoid any tension or struggling over feedings and do not push to finish the portion or play the “just one more bite” game. You have far too many years of feeding your child ahead of you to create struggles over food!

Dairy foods are traditionally offered starting around 7 months (unless there are special concerns about cow’s milk protein sensitivity – check with your pediatrician). Start with whole-milk (full fat) plain yogurts. You may feed it plain or stir in some pureed fruit.

Protein foods are usually introduced next, around 7 to 8 months- pureed chicken, turkey, beef, tofu, egg, small amounts of low-mercury fish like scrod and salmon. Check with your pediatrician for recommendations about giving whole egg vs. egg yolks, and if fish or shellfish should be given or avoided.

Purred meats are thick and pasty. Try adding a tablespoon of pureed chicken to applesauce and feed it alongside a vegetable or cereal.

Again, these suggestions follow the “traditional method” of introducing solid foods, and many experts feel they are outdated and unnecessary. However, they are still the most common recommendations given by pediatricians and baby care books, and many parents feel most comfortable using this traditional method as a guide.


Next up: Making or Buying Baby Foods, Is Organic Important, Finger Foods and Baby Led Weaning


Deep Breast Pain and Pectoral Muscles

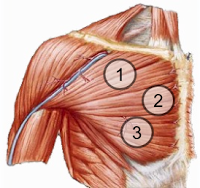
All 3 areas are different sections of the Pectoralis Major muscle. The Pectoralis Minor runs underneath the Major.

Deep breast pain and shooting pains in the breast are often difficult to understand and treat. Sometimes deep breast pain or shooting pains through the breast tissue may be due to yeast infection (sometimes called “ductal thrush”) or a bacterial infection (mastitis). Ductal spasms, called “refilling pain” are thought to be from the milk ducts first emptying, and then refilling with newly made milk, causing tiny muscle spasms. Vasospasm or vasoconstriction of the breast or the nipple, due to pain or damage like a cracked nipple, or hypersensitivity to temperature change or cold (called Raynaud’s Syndrome) can also cause severe nipple and deep breast pain.

Nipple pain, damage and compression can result in vasoconstriction of the tissue and produce radiating pain, often described as shooting pain or stabbing pain in the breast. Because the breast is painful, the nipple, or the latch, is not always pinpointed as the source.

Misdiagnosis is common: mothers and babies are treated, sometimes with minimal benefit, for thrush, infection, tongue or lip ties.

Things that may help deep breast aching or shooting pains in the breast:

Heat to the Breast. A hot shower, hot water bottle, rice sock or heating pad to the area.

Gently “Combing” the breast in the shower. Soap up your breast so it’s slippery, then use a wide-toothed comb to gently “comb” the breast from the ribcage, up toward the nipple, and continue all around the breast. Then shower, and repeat one more time before exiting.

Ibuprofen every six hours for 48 hours to break the cycle of inflammation
If ibuprofen (Advil, Motrin) is a medication you can safely take, the accepted dose for this purpose is 600 mg, taken with food, every six hours for a full 48 hours.

Stretching of the Pectoralis Major and Pectoralis Minor These muscles are located under and connected to your breast tissue, between your breast and the ribcage.  Specific exercises are quick and easy to do morning and evening to promote blood flow, improve muscle strength and flexibility, and reduce pain from friction, adhesions or other irritation.
Here is an easy to follow, effective guide to simple pectoral stretches – give them a try for 30 seconds each stretch, each side, three times a day.

Biting and Breastfeeding

Is your growing baby starting to bite at the breast?

Do your best to (a) be proactive and divert the bite from occurring, (b) If a bite occurs, remove baby from the breast safely using the smoosh-in/release method rather than instinctively pulling your baby away from the breast (which can cause damage, especially once there are has teeth). ( c) No biting/teething/gnawing on other people’s flesh. (fingers, nose, etc)

Biting is most common just before cutting a tooth, and so may come and go as a phase. Babies tend to be most likely to bite toward the end of a feeding so if you know your baby is in a nippy phase, you can be proactive and end the feed yourself when baby slows down, is on and off or mostly “playing around” toward the end.

When nursing, keep your hand close behind baby’s head/neck/shoulders (such as cross cradle position) so that if baby does bite down, you can use your hand to quickly “Smoosh” his face directly right into the breast – because this covers his nose and he can’t breath, he’ll immediately open his mouth, then you can take him off the breast safely without more pain or damage, and calmly but firmly say “No biting”. Do not yell or act angry (or playful). Sometimes it’s hard not to yelp (once child has top and bottom teeth) but you can frighten an older baby into a nursing strike. For a young baby, you can try re-latching or switching sides. For an older baby or toddler, after another bite at the same session, you may consider saying “no bite!” and ending the feeding. (Can try again in a little while).

Starting around 5-6 months (or just before teeth erupt),  don’t let him “chew” on your fingers (or chin or nose) any more. No biting anyone else’s flesh (he doesn’t understand why it’s ok to teethe on your fingers but not your nipple), or, why it’s ok for him to chew on your fingers before he has teeth, but not after…

Biting is an unpleasant phase but like most stages, this too shall pass.

Engorgement

Engorgement – too much of a good thing?

What is it?
A moderate to severe “over-fullness” of the breasts, especially during the first week after birth.

During the first day or two after delivering your baby, your breast tissue will probably feel firm but soft and pliant – fairly “normal”. Then, typically on day 2, 3 or 4 after a vaginal birth, or, day 3, 4 or 5 after a cesarean section, you may notice that your breasts are becoming warmer, tender and swollen. Some people describe this as “milk coming in”, as the colostrum becomes more plentiful and transitions into a thinner, yellowish milk. The breast tissue may feel very firm or even hard and extend into the armpit area. The fullness of the breast is only partly milk, it is also extra blood flow and body fluid (edema) creating the swelling. If this fullness transitions into a painful, hot, hard swollen breast, that is typically called “engorgement” as the breast is engorged, or “overfull”. Again, it’s not all milk that makes the breast so full and hard. But, frequent nursing (or expression) will provide some relief and encourage resolution of the symptoms.

Ice or Cold Packs: keep six small bags of frozen peas or corn in the freezer. These make the perfect ice packs to place around your breasts in between nursing sessions – the cold packs will help reduce swelling and provide needed comfort. Just keep refreezing and reusing, as long as needed.

Add ibuprofen. Ibuprofen is the generic name for Advil or Motrin. This NSAID (non-steroidal anti-inflammatory drug) can help in several ways: by offering relief from discomfort, reducing a low-grade fever (if present) and by helping to reduce the inflammation or swelling of the breasts. Use the ibuprofen (400 – 600 mg) every six hours regularly for best anti-inflammatory action. This medication is approved by the American Academy of Pediatrics for use in breastfeeding women and is considered safe for most. It’s recommended to take ibuprofen with meals or a snack. As always, check with your provider for specifics about your own care.

Engorgement care plan:

  1. Use ice after and between feeding sessions. Keep 6 small bags of frozen vegs (peas, corn) in freezer to re-use/re-freeze. These adjust/form perfectly over your breasts & under armpits just where you need and want them.
  2. Use warmth just before nursing or pumping. Hot washcloth or shower may help soften breast and get milk flowing.
  3. Ibuprofen 600 mg every 6 hours with meal or snack x 48 hours. Keep it up as an anti-inflammatory; it will help to reduce swelling and discomfort.
  4. Pumping to relieve engorgement: it’s okay! As long as you don’t pump frequently, then softening or even emptying your breasts once or twice a day will NOT lead to over-supply or make engorgement worse. Rock hard breasts are NOT healthy, and don’t make it easier to breastfeed.
  5. Not all the fullness in the breast is milk. It’s also edema, interstitial fluid. So pumping may soften breasts but may not relieve all fullness.
  6. Babies will latch easier when the areola is softer. Otherwise, it’s like trying to latch onto a firm beach ball with an M&M glued to it, covered in olive oil. Good luck, and she’ll just grasp the nipple and hang on for dear life. Ouch.
  7. You can use manual (hand) expression, or a manual-pump, or your electric breastpump to soften the breast just prior to nursing. Express to relieve fullness or allow the milk to let down and spray before bringing the baby to the breast.
  8. Positioning: Baby under breast will be overwhelming if the milk is flowing fast. Have baby’s head either level to, or above, the breast especially at the beginning of a feeding session when the flow is heaviest if he tends to cough, choke or splutter with fast flow.

Babies Don’t Keep (poem)

Song for a Fifth Child (Babies Don’t Keep) by Ruth Hulburt Hamilton

Mother, oh mother, come shake out your cloth!
Empty the dustpan, poison the moth,
Hang out the washing and butter the bread,
Sew on a button and make up a bed.
Where is the mother whose house is so shocking?
She’s up in the nursery, blissfully rocking!

Oh, I’ve grown as shiftless as Little Boy Blue
(Lullaby, rockaby, lullaby, loo).
Dishes are waiting and bills are past due
(Pat-a-cake, darling, and peek, peekaboo).
The shopping’s not done and there’s nothing for stew
And out in the yard there’s a hullabaloo
But I’m playing Kanga and this is my Roo.
Look! Aren’t her eyes the most wonderful hue?
(Lullaby, rockaby, lullaby loo.)

Oh, cleaning and scrubbing will wait till tomorrow,
But children grow up, as I’ve learned to my sorrow.
So quiet down, cobwebs. Dust, go to sleep.
I’m rocking my baby. Babies don’t keep.

This poem first appeared in the Ladies’ Home Journal in 1958. Our chores and distractions may have changed a bit in the past 60 years, but the sentiments here have not…

How Babies Develop

Baby finding feet around 5 months, and eating them around 6 months is an example of typical infant cephalocaudal motor development
Baby finding feet around 5 months, and eating them around 6 months is an example of cephalocaudal infant development (and one of my all-time favorite baby poses…)

There are two overriding principles of overall infant motor development called: Cephalo-Caudal and Proximal-Distal. 

Cephalo-caudal development literally means “from head to tail”. Babies develop motor strength and muscle control starting at the very top: Cephalo- the Latin word for “Head”, toward the bottom: Caudal- Latin for “tail”.  This is why Tummy Time, which strengthens the head, neck and upper truck muscles, is so important.  Your baby will first work on achieving head and neck control, then upper body strength in the arms, shoulders and upper torso, then lower abdominal strength (watch for “sit-ups” and leg-thumps), and finally, the balance and strength and needed for sitting, then walking. There’s a reason we develop muscle strength and control from the top downward rather than from the bottom up: just imagine if our legs were able support the rest of our body when the trunk muscles and head/neck were still floppy and unable to stay upright and aligned! That wouldn’t work at all!

Proximal-Distal development means “from near to far”, with “near” referring to the very center of your baby’s body. In other words, development starts at the center, with increasing control gradually spreading from the center, outward, further and further. As an example, first your baby will work to control his arm movements (to fling his arm out in the correct direction to hit a dangling toy), then his whole hand (to grab something in a clumsy fist), then finally his fingers (the ability use two fingers – pincer grasp – to pick up a bit of cereal, or one finger to point or poke a toy).

Both principles of development, Cephalo-Caudal and Proximal-Distal exist and work together simultaneously. All humans, all over the world, for thousands of years, develop this same way. Your baby will follow these similar patterns of development. Though the timing may vary from baby to baby, the order that the developmental achievements occur will remain similar. Babies must achieve head control before they are able to work on sitting or walking. A baby needs to be able to control his arm movements before he can learn to pick up a grain of rice.

In addition to these principles of development, there are various areas of development, many of which may overlap one another.

Gross Motor Development refers to the bigger body muscle groups and movements. Some examples of Gross Motor Milestones are head control, sitting, crawling, standing, walking and running. Surprisingly, “rolling” is not considered a motor milestone. Rolling is quite variable and doesn’t happen in a predictable fashion.  Most gross motor milestones do occur in a predictable order (though not necessarily at an exact predictable age).

Fine Motor Development refers to the coordination of the smaller muscle groups. Intentionally bringing hands to the mouth, passing a toy from hand to hand or picking up a small bit of food are examples of fine motor development. Learn more about How Babies Find Their Hands

Other areas of infant development  include Language Development, Social-Emotional Development and Sensory Development.

Vary your baby’s position many times throughout the day. The passive recline position does not offer much in the way of muscle development or stimulation. Tummy time, holding and carrying, “wearing” your baby in a sling are all richer developmental opportunities.

Fine Motor Development for Babies

"She started with the pair of links - and now has graduated to the Winkel!"
“She started with the pair of links – and now has graduated to the Winkel!”

How babies find and use their hands
A baby’s grasp is reflexive, and most young babies keep their hands tightly fisted, or curled closed, when they are awake and alert. You’ll notice your baby’s fists soften and open slightly when they are relaxed, such as halfway into a feeding or asleep.

Even though their fists are closed, the grasp reflex is present. When a baby feels something on their palm, he’ll usually respond by curling his fingers and holding on. By offering appropriate objects in an intentional way, you can help your baby become more aware of their hands and arms, and explore the movements and coordination leading to hand and arm control. The increasing voluntary control of the hands and fingers is called “Fine Motor Development”. (“Gross Motor Development” are bigger body movements like sitting and pulling to a stand – Learn more about How Babies Develop)

You can help your young baby build increasing awareness of their hands and work on developing more voluntary control over the movements of arms and hands by taking advantage of the grasp reflex.

Baby’s first “toy” – Just a pair of links.

Take two simple baby toy “links”, clicked together, and place them in your baby’s palm. If his fist is closed tightly, try tapping on the small part of your baby’s exposed palm below the curled fingers. The fingers will quickly relax then tighten again. Take that moment to gently unfold his fingers to place the link in his palm, then loop it over his fingers. This way, his thumb will serve as a hook to help keep the links in his hand even if his hand opens and closes several times over the playtime.

Once your baby is holding the pair of links, he’ll randomly move arms and hands, and when doing so, the links will gently click and clack. Over time, your baby will begin to move his arms and hands more, and will also bring his hand up to the mouth. As soon as a baby can deliberately bring hands toward the mouth, he will: this isn’t necessarily a sign of hunger or an emerging tooth. It’s a very normal developmental behavior that means “Awesome! I can get my hands in my mouth now! Nom Nom!” Your baby will mouth his hands and fingers, and any portion of the links that he can bring to his mouth.

Try “playing” with the links each day. You’ll probably notice that your baby begins to seem more aware of his hands when he’s holding the links and begins to move them with more intention.

ALSO: Add additional links to the toys that dangle down from your baby’s playmat arches so that his still-very-random arm and leg movements can connect with the toy. Bring the toys down to where your baby’s natural movements happen to be. Your baby may not be able to reach out and grab at the toys dangling over him for a while yet, but if the toys are dangling close to their hands, they will become much more interested and engaged.

Often babies will flail out with an arm or hand and hit a toy over and over, making it rattle and move, while looking off in a completely different direction. Just because he’s not looking, doesn’t mean he’s not working hard to figure out how to move his body to connect with the toy. ALSO moving his head, and the cognitive steps of his understanding what he’s seeing (wow, that’s my arm, with my hand, hitting that toy, which is making that noise) is still a whole lot of information to process. If he’s swiping out with his arm to connect with a toy over and over, he’s showing you a new purposeful skill even if he’s not looking.

Texture Exploration: let your baby feel different types of textures by helping him stroke his hand or fingers over things. Touch soft, hard, shiny, fluffy, warm, cool, crunchy, velvety, scratchy textures, and verbally describe for her what it feels like (called “narrating your activities”).

– Good early/first “toys” (you’re doing most of the work) – the simple pair of links. Other perfect early toys include soft fabric books, crunchy and crinkly toys and fabrics, and easy grasp rattles that are lightweight, easy to hold and easy to clean.

What comes next? You’ll begin to see one hand to the mouth more and more often by three months. Watch to see if your baby brings hands together to midline (the center of the body) when in the carseat or sitting upright. Usually by three months, your baby will be interested in grasping and clutching his own hands together, and by four months, will be working very hard at getting both hands in the mouth at the same time. He’s got to make room in there, because around five or six months, he’ll be trying to bring his foot into his mouth. Really! Fun times ahead.

A portion of this article appeared on the Baby+Co blog