Category Archives: Uncategorized

Deep Breast Pain and Pectoral Muscles

All 3 areas are different sections of the Pectoralis Major muscle. The Pectoralis Minor runs underneath the Major.

Deep breast pain and shooting pains in the breast are often difficult to understand and treat. Sometimes deep breast pain or shooting pains through the breast tissue may be due to yeast infection (sometimes called “ductal thrush”) or a bacterial infection (mastitis). Ductal spasms, called “refilling pain” are thought to be from the milk ducts first emptying, and then refilling with newly made milk, causing tiny muscle spasms. Vasospasm or vasoconstriction of the breast or the nipple, due to pain or damage like a cracked nipple, or hypersensitivity to temperature change or cold (called Raynaud’s Syndrome) can also cause severe nipple and deep breast pain.

Nipple pain, damage and compression can result in vasoconstriction of the tissue and produce radiating pain, often described as shooting pain or stabbing pain in the breast. Because the breast is painful, the nipple, or the latch, is not always pinpointed as the source.

Misdiagnosis is common: mothers and babies are treated, sometimes with minimal benefit, for thrush, infection, tongue or lip ties.

Things that may help deep breast aching or shooting pains in the breast:

Heat to the Breast. A hot shower, hot water bottle, rice sock or heating pad to the area.

Gently “Combing” the breast in the shower. Soap up your breast so it’s slippery, then use a wide-toothed comb to gently “comb” the breast from the ribcage, up toward the nipple, and continue all around the breast. Then shower, and repeat one more time before exiting.

Ibuprofen every six hours for 48 hours to break the cycle of inflammation
If ibuprofen (Advil, Motrin) is a medication you can safely take, the accepted dose for this purpose is 600 mg, taken with food, every six hours for a full 48 hours.

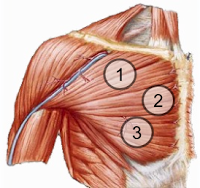
Stretching of the Pectoralis Major and Pectoralis Minor These muscles are located under and connected to your breast tissue, between your breast and the ribcage.  Specific exercises are quick and easy to do morning and evening to promote blood flow, improve muscle strength and flexibility, and reduce pain from friction, adhesions or other irritation.
Here is an easy to follow, effective guide to simple pectoral stretches – give them a try for 30 seconds each stretch, each side, three times a day.

Tips for New Eaters: Finger Foods

"Bag Cheese" is a real winner here!
“Bag Cheese” is a real winner here!

Are you moving from spoon-feeding purees to starting to offer bits and pieces of food? Here are some tips that address common questions new parents may have during this transition.

1. Not so big. Bits of food for self-feeding should be about the size of your baby’s thumbnail, or smaller than a dime. Bits of toast, waffles, pancakes, French toast, grilled cheese sandwiches and muffin bits are usually well-received by babies and are easy foods for them to manage.

2. Nothing hard, sticky or chewy. Hard foods like raw carrots or apples can be sliced then steamed before offering. Raisins may be soaked in hot water to soften.

3. Avoid round foods and coin-shaped slices. Foods like grapes, steamed carrots, string cheese sticks, hot dogs  (a whole other can of worms) should be chopped small to reduce the risk of choking.

4. Teeth aren’t needed to chew. As long as the foods you offer are soft enough for you to to squish between your thumb and forefinger, your child should be able to chew them just fine with his gums even without molars.

5. Offer a preloaded fork or spoon if your child is eager to feed himself. Reduce frustration by using foods that stick to the spoon (like yogurt) rather than foods that drip off  (like soup). Soft cooked elbow macaroni makes a good introduction to fork feeding.

6. If your baby stuffs too much in his mouth at once (or throws it all on the floor), just offer a few bits on the tray at a time and add more pieces after the first few are eaten.

7. Skip the kids’ menu at restaurants. Offer bits of chicken, baked fish, meatball, potato, rice, pasta, steamed vegetables, baked beans, roll. Make steak “shavings” by scraping at the surface of the steak with a knife.

8. Say “cheese”. Shredded mozzarella or Monterey Jack cheese in the zip-seal pouches (called “bag cheese” in my house) sprinkled on the highchair tray is a speedy snack that can keep a snacking baby busy for awhile.

9. It’s okay to help. Your baby does need to learn how to feed herself, but it’s okay to pop in a bite here and there or spoon feed purees or mashed food in addition to foods your baby picks up.

10. Sensory-Sensitive. Some babies are especially sensitive to the sensation of textures or dislike having their hands dirty. Use dry foods like toast bits, rice cakes or cereal rather than mushy food like banana slices to practice finger-feeding and hand-eye coordination.

Bonus: Respect your baby’s cues and don’t try to push in more food than your baby wants. “One more bite” really won’t make any difference in terms of your child’s nutrition

Oral Motor Muscle Stimulation Exercises… For Babies

This may be cute (sort-of), but it’s certainly not the technique I outline below

Sometimes babies need some help “waking up” all their sucking muscles prior to nursing or taking a bottle. Other babies simply seem to latch or eat solids (purees or textures) better several days after starting these exercises.

Oral Motor Muscle Stimulation massage techniques as follows:

Remember to do each movement several times, with gentle pressure, slowly and deliberately. The entire “routine” should take less than 30 seconds.

  1. Cheek circles (gently move cheeks in circular motion, and inward to make “fishy lips”. Repeat x5
  2. Over the ears and under the jaw. (With both hands, stroke from each cheek to the temples, then around the ears and under the jaw. Repeat x5 )
  3. Trace top lips and bottom lips with finger (“applying chapstick”) x5.
  4. Trace down from nose to lip to chin. Use finger or knuckle to (slowly) gently stroke from bridge of nose down to top lip, bottom lip and chin, gently rolling bottom lip out (only if baby allows) and gently press chin down as if opening mouth (only if baby allows).

Notes:
1. If you are working on tongue extension, remember to stick your tongue way out several times while massaging and praise baby for mimicking the motion.

Is Burping Always Necessary?

I’m often asked about burping: when to try, how long to try, what if baby doesn’t burp?  Burping is optional, not mandatory every time for all babies, and your baby may or may not burp at any given session. Chances are, you’ll learn the ins and outs of your own baby soon, and will decide how important (or not) burping may be to your baby.

Though most young babies are “gassy” (ahem: Gassy Baby: Digestive Drama) this is only partially due to swallowed air that might come up with a burp. Much of the gas experienced (and passed) by infants is related to digestion and motility, rather than swallowed air. If you are trying for a burp for a minute or two with no luck, try another position (see below) or give up and continue with the feeding or next activity.

When breastfeeding, most babies don’t take in a lot of air (though some might, especially if there is a lot of on/off at the breast during feeding) and might not have a big burp to release. However, it’s worth trying for a burp most of the time. Sitting your baby up to burp after nursing on the first breast may help to rouse her for the second breast, helping her take in a little more milk. Then, burping after ending the feeding may help the milk to settle in her tummy and prevent extra spit up. Or not.

When bottle-feeding, it’s definitely a good idea to take a pause midway through the feeding for a burp, and at the end of the feeding as well. This helps to “pace” or slow down the bottle feeding, allows for additional interaction, and may help to reduce spit up.

Whether breastfeeding or bottle-feeding, use the baby’s natural pauses to time a burp break. Don’t pull away the nipple from a baby who is busy eating – she may protest, cry, and take in air, likely defeating your goal! Instead, when she begins to fall asleep, flutter-sucks with long pauses, or releases the nipple from her mouth, that’s a good time to try.

Try these favorite burping positions for newborns. In these positions, pat your baby’s back gently, or a little more firmly, or alternate pats and circle rubs on her back, while putting a little gentle pressure on baby’s tummy area.
And, baby may not burp – it’s ok!

  1. Resting with her tummy HIGH up on your shoulder (for gentle tummy pressure) with her head cuddled near your neck.
  2. Sitting upright (or slightly leaning forward) on your lap with her chin/cheeks supported in your hand. (this one is good for helping to rouse a sleepy baby)
  3. Laying tummy down over your lap with her face turned to the side.

A note about Spit Up:
Some babies tend to spit up a lot, with or without regular burping. If you have a spitter, you’ll know!
If your baby is a spitter, position a burp cloth, receiving blanket or small towel over your shoulder or lap when burping. It’s common for a mouthful (or more) of milk to come up with a burp, and this doesn’t mean your baby overfed. Expect to see more spit up, not less, by the 3rd or 4th month as baby is eating larger volumes and jiggling her body, arms and legs more.

Pumping and Working? Here’s What to Pack

Heading back to work, messenger bag on one shoulder, breastpump bag on the other? There’s a surprising amount of extras to pack to make pumping at work more efficient!

What to pack in your pumping bag

  • Hands Free Pumping Bra: the Simple Wishes Hands-Free Bustier is truly a must have for those who pump regularly. Watch 5 Tricks for Better Pumping  to learn the benefits of hands-free, hands-on, double pumping.
  • Hand Sanitizer – alcohol-based, like Purell.
  • Medela Quick Clean Wipes – an easy way to clean pump parts between use, may also be used to wipe down a desk or table before expressing milk.
  • Enough milk storage bottles for the day (typically six are needed – one pair of bottles for each of three pumping sessions during a full work day) plus extra zip seal milk storage bags.
  • Lids. For some reason, moms often pack the bottles but forget the caps. Milk storage bottles don’t work so well without the lids!
  • Baby’s receiving blanket: Drape this over your lap when pumping to protect your clothing from drips, and to serve as a tactile reminder of your sweet baby.
  • Nursing cover-up, scarf or shawl for semi-private pumping locations (your cube, staff room, car in parking lot…).
  • Alternate Power Source: Extension cord or vehicle lighter adapter – Pumps that use AA batteries quickly begin to lose cycling speed and efficiency as the batteries drain down. It’s better to plug directly into the wall, or use the car battery (not while driving!) instead of an external battery pack, when possible. Pack spare batteries just in case. Pumps with internal lithium-ion batteries, like the Medela Freestyle, have the clear advantage here.
  • Non-perishable snacks or protein bars. Keep your bag stocked with high-protein snacks easy to eat with one hand.
  • Olive oil in a tiny Ziploc bag. Dip your clean finger in and lubricate the flange to reduce friction.
  • Large cooler to hold your milk and pump parts. Use several frozen water bottles as your ice packs – you can sip the ice water as it slowly melts throughout the day, while pumping.
  • Headset or earphones so you can make phone calls, listen to music or podcasts or participate in webinars (like my weekly baby chats!) while pumping.
  • Your keys or bus/train pass: store these in your cooler bag so that you cannot leave work without your day’s milk!
  • Packing List: Tape a printed checklist of everything YOU like to pack in your pumping bag, to take a quick audit when packing your bag for work each day – much less chance of forgetting something!