Category Archives: Infant Health & Safety

Tips for New Eaters: Finger Foods

"Bag Cheese" is a real winner here!
“Bag Cheese” is a real winner here!

Are you moving from spoon-feeding purees to starting to offer bits and pieces of food? Here are some tips that address common questions new parents may have during this transition.

1. Not so big. Bits of food for self-feeding should be about the size of your baby’s thumbnail, or smaller than a dime. Bits of toast, waffles, pancakes, French toast, grilled cheese sandwiches and muffin bits are usually well-received by babies and are easy foods for them to manage.

2. Nothing hard, sticky or chewy. Hard foods like raw carrots or apples can be sliced then steamed before offering. Raisins may be soaked in hot water to soften.

3. Avoid round foods and coin-shaped slices. Foods like grapes, steamed carrots, string cheese sticks, hot dogs  (a whole other can of worms) should be chopped small to reduce the risk of choking.

4. Teeth aren’t needed to chew. As long as the foods you offer are soft enough for you to to squish between your thumb and forefinger, your child should be able to chew them just fine with his gums even without molars.

5. Offer a preloaded fork or spoon if your child is eager to feed himself. Reduce frustration by using foods that stick to the spoon (like yogurt) rather than foods that drip off  (like soup). Soft cooked elbow macaroni makes a good introduction to fork feeding.

6. If your baby stuffs too much in his mouth at once (or throws it all on the floor), just offer a few bits on the tray at a time and add more pieces after the first few are eaten.

7. Skip the kids’ menu at restaurants. Offer bits of chicken, baked fish, meatball, potato, rice, pasta, steamed vegetables, baked beans, roll. Make steak “shavings” by scraping at the surface of the steak with a knife.

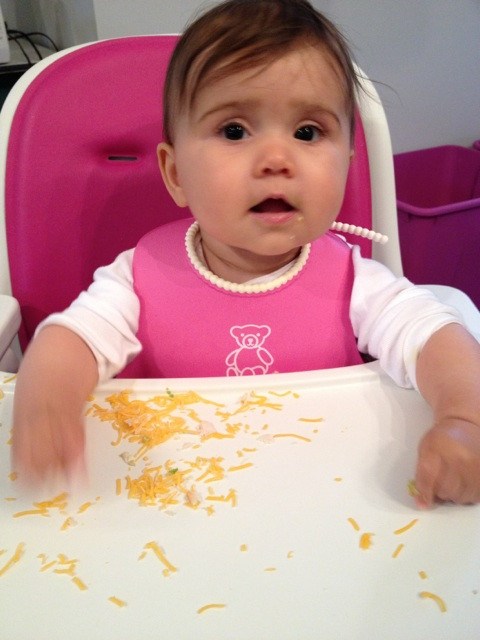
8. Say “cheese”. Shredded mozzarella or Monterey Jack cheese in the zip-seal pouches (called “bag cheese” in my house) sprinkled on the highchair tray is a speedy snack that can keep a snacking baby busy for awhile.

9. It’s okay to help. Your baby does need to learn how to feed herself, but it’s okay to pop in a bite here and there or spoon feed purees or mashed food in addition to foods your baby picks up.

10. Sensory-Sensitive. Some babies are especially sensitive to the sensation of textures or dislike having their hands dirty. Use dry foods like toast bits, rice cakes or cereal rather than mushy food like banana slices to practice finger-feeding and hand-eye coordination.

Bonus: Respect your baby’s cues and don’t try to push in more food than your baby wants. “One more bite” really won’t make any difference in terms of your child’s nutrition

Oral Motor Muscle Stimulation Exercises… For Babies

This may be cute (sort-of), but it’s certainly not the technique I outline below

Sometimes babies need some help “waking up” all their sucking muscles prior to nursing or taking a bottle. Other babies simply seem to latch or eat solids (purees or textures) better several days after starting these exercises.

Oral Motor Muscle Stimulation massage techniques as follows:

Remember to do each movement several times, with gentle pressure, slowly and deliberately. The entire “routine” should take less than 30 seconds.

  1. Cheek circles (gently move cheeks in circular motion, and inward to make “fishy lips”. Repeat x5
  2. Over the ears and under the jaw. (With both hands, stroke from each cheek to the temples, then around the ears and under the jaw. Repeat x5 )
  3. Trace top lips and bottom lips with finger (“applying chapstick”) x5.
  4. Trace down from nose to lip to chin. Use finger or knuckle to (slowly) gently stroke from bridge of nose down to top lip, bottom lip and chin, gently rolling bottom lip out (only if baby allows) and gently press chin down as if opening mouth (only if baby allows).

Notes:
1. If you are working on tongue extension, remember to stick your tongue way out several times while massaging and praise baby for mimicking the motion.

Does My Baby Need Water? Introducing Cups and Drinks

When the weather gets warm, parents often wonder and worry about their baby’s hydration. During an infant’s early weeks, parents are warned that water is dangerous for babies, so the very idea of putting water in a cup or bottle makes parents nervous even beyond the newborn stage. However, midway into your baby’s first year, offering water in a cup for fun and practice will be a learning activity that helps keep your baby cool (and wet!). What should you know about offering water to your young child?

From birth – 3 months:

No water for newborns. Newborns have tiny bellies, so a bottle of water would take the place of important milk calories needed for growth and development. And because a newborn’s body is small, too much water can alter the normal electrolyte balance necessary for heart and brain functioning. Bottom line, newborns should not be given water. Breastmilk or properly mixed formula will provide the correct balance of liquids needed for hydration and thirst, even when the weather is very hot.

From 4 – 6 months:

Not dangerous, not necessary. An ounce or two of water once a day at this stage isn’t dangerous, but isn’t necessary either. Breastfed babies may nurse for very short periods of time during hot weather, when they are thirsty (rather than hungry) and research shows that even in tropical environments when the weather is above 100°F every day, breastfed babies do not require any additional liquids. For formula fed babies, check with your pediatrician for recommendations. Some pediatricians will suggest offering an ounce or two of water in a bottle if the weather is very hot while others say stick to formula only. Water should not take the place of a breast or bottle feeding, and formula should never be diluted beyond the proper mixing directions in order to offer additional water.

Around 5 – 7 months:

Introducing a cup:
At this age, babies are interested in holding and mouthing objects, and may be ready to explore the skills of drinking from a cup. Choose a sippy cup without a valve initially, so that the cause and effect of tentative sucking pays off with an easy result of water. Pick a small-sized cup of 4 – 6 ounces, because it’s best to fill the cup all the way up to the top so that your baby won’t need to tilt the cup all the way up and lean her head back in order to get water (that’s a lot to coordinate)! A larger cup filled all the way up becomes too heavy for small hands to hold and easily manipulate. Make sure your baby is in a supported upright position when given the sippy cup. Your baby might cough and splutter a bit but will soon learn how to coordinate the sucking and swallowing required for drinking. Your baby might also enjoy squirting the water out of her mouth, and getting wet is part of the process. You can also offer sips from an open cup with assistance.
Water at this age is just for fun and practice. Your baby will still receive full hydration (and nutrition) from breastmilk or formula. Once started, common baby foods including pureed fruits and vegetables are also very high in water content and will add to their liquid intake.

What to put in the cup? Water! Just water.
Give your child a taste for water from early on. Water is the best and healthiest drink for children and adults. Filtered tap water is usually a safe and healthy option. Check with your area’s Department of Public Works to find a link to your town’s water source if you have concerns about lead or other contaminants, or want to know how your water is sourced or tested. Information about fluoride will also be publicly available. Bottled spring water and “nursery water” adds additional expense and environmental waste that may be unnecessary if your tap water is safe for drinking. If it is suggested that you boil water for cooking or drinking, bring to a boil for only 3 minutes, which is long enough to kill bacteria but short enough so as to avoid concentrating any minerals that might be in the water.

What about juice? Wait to introduce, then use sparingly if used at all.
Juice is really just Nature’s Kool-Aid and ounce per ounce, actually contains the same (or more!) sugar and calories than Coke and Pepsi! Sure, juice contains natural fruit sugar, but it’s still just sugar (and a lot of it), adding up to considerable extra calories without offering any significant nutritional benefits. Juice also bathes tiny teeth with sugar and can lead to dental cavities, especially when a sippy cup or bottle of juice – even diluted juice – is sampled frequently throughout the day or night. The concentrated sugar load in undiluted juice can also cause diarrhea or diaper rash.

Think of juice as a treat or add-on, but not as an important part of your child’s daily intake. When used, limit daily juice intake to 4 – 6 ounces a day in total, and dilute juice by 50% (for example, 2 ounces of juice and 2 ounces of water). Even though this reduces the total amount of sugar and calories, it’s still a sugar bath for the teeth.

A good approach is to put only water in a sippy cup for daytime use, and save milk or diluted juice to use at the table during meals, while practicing drinking from an open cup. Keeping to this policy of “only water in the sippy cup” will save you the unpleasant discovery of finding a sippy cup of moldy juice or milk that has rolled under the couch! (And hopefully you find it before your toddler does!)

Interested in this topic? Watch my webinar on introducing cups, straws, milk, “milks”, juice and water (also Baby-Led Weaning is covered in this webinar too)

Learning to Sit: Tripod Sitting Position

Learning to sit: Tripod Position

Laila Rose tripod sit
Laila Rose shows off a lovely tripod or “propped” sit at almost five months old.

Once your baby’s neck and trunk muscles are strong enough, he’ll be ready to learn to sit up independently.

Although you can prop or support your baby in a sitting position by around three months, independent sitting doesn’t begin until your baby has sturdy head control and strong trunk and abdominal muscles to keep his head and spine in an upright, aligned position. Starting at about four months, your baby’s neck and head muscles strengthen rapidly through play, and he’ll learn to raise and hold his head up while lying on his stomach. That tummy time is important to strengthen the arm, shoulder and neck muscles that are needed for propping himself up in the sitting position, and later, to help with crawling.

At four months, your baby may have been able to prop himself up on his bent forearms for short periods of time, and at five months, he can probably push himself straight up with unbent arms and hold his chest off the ground, like a little pushup. Once he can do this, he probably also has the muscle strength to be able to practice a Tripod Sit.

Tripod Sitting is the term used for a baby who is sitting, but uses his arms as the tripod, the third “leg of the stool” to keep his body upright. Sit with your baby on a carpet or foam play mat and help position his legs with his knees pointing out toward the sides, and his feet several inches apart. Tripod sitting is also called “ring sitting” because the legs form an open ring position. This position gives him a wider base of support for more stability. Help him position his arms within the “ring” of his legs in the front, so he’s leaning slightly forward propped up on his hands.

His head is still heavy, so when tired, he’ll probably “melt” forward toward his feet, essentially folding himself in half – it looks quite uncomfortable to adults but babies don’t seem to mind much – and will either play with his toes, or end up rolling to one side and onto his back. When practicing tripod sitting and being distracted by someone walking by him in the room, he may turn his head to watch, and even that small movement may take him off balance, and over he’ll tumble!

As he practices tripod sitting at six months, you’ll see that the more you practice, the longer he’s able to maintain the position… until he decides to pick his hands up to reach for a toy or put his hands in his mouth. Then, over he will go. But after several weeks of tripod sitting, you’ll begin to see that he can lift first one hand, then both for short periods and still remain upright. Watch and notice that he is developing a sense of balance – as he feels himself tip to one side, does he begin to use that arm to stabilize himself back into an upright position? Exciting!

TLDR: Most babies can sit with support or tripod sit by the end of six months, and can sit well without support by eight months. Tummy time doesn’t go away, it transitions into floor time and is important for muscle development.

Tummy Massage for Gas

Tummy massage for gas

Unlike other types of infant massage, this one has very specific hand movements and a very specific purpose. To gently stimulate peristalsis, to encourage motility of intestinal contents (BM and gas),  to provide a “cueing sound”, and finally to offer something for baby to strain against.

Here’s how to do my very specific “Tummy Massage for Gas”

  • Hand-Over-Hand on the Lower Belly: Gently stroke your baby’s tummy from top to bottom using first one hand, then the other, like a paddlewheel. As the belly first tenses, then gradually relaxes, press your hand deeper using a scooping motion.
  • Whoosh! Add your ‘whooshing” sounds during the which soon baby will recognize signals relief or relaxation.
  • Straight Across: Now stroke from YOUR left to YOUR right – straight across, gentle but moderate pressure, just at or below the belly button.
  • Now, Across and Down: Continue the Straight Across stroke, but now ADD the downward stroke, now moving across and down, ending inside the baby’s thigh crease. It’s like a sideways “L” or “7”.
  • Legs Up and Hold’em In Place: Flex baby at the hips and knees toward the tummy, gently press and hold in place, counting slowly to twenty. Repeat the entire sequence two or three times.
    (video coming soon)

Many babies will pass gas during the exercise or have a BM a few minutes later – success and relief for everyone!

Why I LOVE the NuRoo Pocket


1. Skin to Skin for Parents and Preemies

The NüRoo Pocket is one of the only products truly designed to be completely NICU-friendly, allowing safe and uninterrupted Kangaroo Care for tiny preemies. Various secret openings allow nurses access for lines and monitors, and baby’s face is visualized the entire time.

Skin to skin care has many (many!) evidence-based benefits for baby (brain development, weight gain, heart and breathing regulation) and for mom (milk production, postpartum recovery) – these things are especially important for preemies, but are highly beneficial for every newborn or young infant. Skin to skin care is not just for premature babies, but when used in the NICU setting, the NüRoo gives a new mom a comfortable, discreet Kangaroo Care experience.

2. Truly the Perfect First Baby Carrier: Safer Babywearing from Newborn to 15 lbs

It’s quick, easy and secure and very simple to use, which helps new moms feel more confident with babywearing and soothing. Learning to use a wrap or ring sling can feel overwhelming to a new mom, and the inserts needed for soft structured carriers add a lot of bulk. Young babies need to be held, cuddled close and kept moving so much of the time! It’s important for a new mom to be able to put her baby into a carrier swiftly, easily and safely positioned. This carrier is designed specifically for tiny newborns through about 3-4 months – it’s rated to 15 lbs. Use it as a baby carrier, but at home, take advantage of the ability for true skin-to-skin babywearing, which helps with breastfeeding and milk production.

3. It feels sooooo good to wear baby in this “garment”

I’m a chronic baby-wearer and advocate, both personally and professionally. For the past 25 years, I’ve had the persistent desire to scoop up young babies and pop them in a sling. And I’ve always looked at various objects (scarves, bags, backpacks) and pieces of clothing and said “wow, I could make a baby carrier out of that!” (and, frankly, have been known to do so, with varying levels of success…)  This is exactly the shirt/system I’ve created “makeshift” numerous times in the past. Baby slipped inside a snug stretchy shirt, then safely secured by the tails of a sweater or over shirt. And, like magic, here it is.

I’m calling it a baby carrier, but it’s really a shirt (and fashionable, at that). Stretchy, lightweight fabric feels comfortable on, but once you have baby in the pocket and secure the waist-band support belt snugly, it truly feels wonderful. You can run your hands over that sweet baby bump and with your baby cuddled so close, secure and content, look down and kiss that sweet head, then go take a walk or make a sandwich in the kitchen.

4. I’ve watched it grow and develop – and now, be born!

The NüRoo Pocket is the result of several years of hard work, research and love by two Rhode Island mamas Daniela and Hope (moms, health care providers, and kangaroo care/skin to skin specialists), who asked to meet with me at Isis Parenting in 2011. I admit to being initially skeptical (Do we really need another baby carrier? Do we need a special garment to facilitate skin to skin care?), but after seeing the early prototypes, I fell in love with their vision. And over two years of development, they returned again and again to show updated prototypes, discuss features and fabrics, and bring samples for me to try and comment on. In 2013, I finally saw the end result and I was blown away. This is the perfect product for safe, easy newborn and infant babywearing, and a wonderful gift for a mom with a baby in the NICU. Available at Babies R Us and online at NüRoo Pocket.

Take a Bath with your Baby!

Does bathing with your baby seem like an odd idea, strangely appealing, or both?   Even a very young baby can go in the tub with either parent. The warm, deeper immersion is very relaxing yet stimulating to newborns and infants, perhaps reminding them of time floating in utero. You and your baby will love it, and it’s the easiest way to bathe your baby without screaming, while also earning you a nice hot soak at the end – that alone should make you a convert!

Why take a bath with your baby?

Baby’s happiness: Newborns often cry in the infant tub because only half their body is submerged in the warm water while the other half is cool. Also, the smaller amount of water tends to cool off quickly. Floating in a warm deep tub with a parent is a very different and enjoyable sensation for your baby. In the bathtub, watch your baby, with wide open eyes, calmly stretch out her arms and legs and float. It’s also very easy to wash your baby head to toe in the big tub, and it’s certainly a beautiful photo opportunity!

Bonding: Skin to skin in warm water is a delicious feeling for both parent and baby. In a breastfeeding family, having the non-nursing parent take a bath with baby offers physical closeness and is a bonding activity that has nothing to do with feeding and changing diapers. Partners enjoy having a special activity to share with baby, and being the one to have a regular baby-bathing routine. If dad feels a little funny about it, he can wear boxers or swim trunks.

Start any time: Some parents begin co-bathing during baby’s very first week – you don’t need to wait for a newborn’s cord to fall off before giving an immersion bath. Simply dry the area around the cord gently after bathing. Some parents find co-bathing a perfect remedy to a young baby who screams in the infant tub, or who no longer fits in the baby tub but is still too young to sit alone in the big tub. At any rate, there’s no age or time limit on co-bathing – it’s neither too soon nor too late to give it a try.

How to do it: Set up for Safety and Success

Prepare the tub: Your bathtub doesn’t have to be especially large or pristine. Rinse out the tub, and then fill it deeply with water that is quite warm – not as steamy as you’d like if you were bathing for relaxation, but not lukewarm either. Don’t use bubble bath, this is irritating to baby skin.

Prepare the room: Gather what you’ll need for washing your baby, and set up a diaper, lotion and clothing for afterwards. Keep the bathroom door closed while you’re filling the tub, to create a warm and humid room environment. Set up your baby’s bouncer seat or car seat, lined with a bath towel and cloth diaper, right next to the tub. Place your naked baby in the seat and then get into the tub yourself.

In and out safely: Once you’re safely sitting in the tub, reach over and pick up baby from her seat. When exiting the tub, do the same thing in reverse: while still sitting in the tub, lean over and place baby back in her lined seat and cover with the towel before exiting the tub yourself. This way you’ll avoid needing to climb in or out of the tub while holding your baby.

Floating in the Bath: With your hand behind baby’s head, allow your baby to freely float – she’ll LOVE the deep warm water. Watch her arms and legs stretch out, wave and kick. Your baby’s eyes may open wide open in amazement while she remains calm and alert throughout the bath. This is the perfect time for your partner to take some photos!

Don’t drink the water: Always keep your baby’s chin above the water line. Babies may try to lap at water they feel near their lips. Try to avoid your baby’s drinking of the bath water (though a lap or lick of water will not harm your baby). If you notice that your baby pees, don’t worry! Baby urine is a tiny amount and essentially sterile and is no problem in the tub. Poop, however, does end the fun – fortunately, it’s a rare occurrence!

The Hand-Off: If your partner is home, arrange to “hand off” baby after her bath. Your partner can get baby soothed, moisturized, diapered and dressed – all without your interference. All the while, YOU can add more hot water to the tub and soak for another 20 minutes! This may be the only time all day you’ve spent caring for yourself or having your own space. When you’re in the tub, you also can’t hover, help, critique or multitask. Just sit there, relax and soak.


The Gassy Baby: Such Digestive Drama

“Why is my baby so GASSY?”
Is your young baby gassier than the average baby? Most newborns are both gassy, and dramatic about it, with lots of grunting, straining, arching, thrashing and tooting, and so it’s not surprising that most moms believe their new baby must be “gassier than normal”.

If your baby is gassy, it’s probably not from something in your diet, nor a sign he wasn’t burped enough after a feeding. Intestinal gas is a normal byproduct of food or milk digestion rather than from air swallowed while eating or crying. Most swallowed air will eventually come up as a burp (sometimes with milk attached) either with or without your help.

The Gastrocolic Reflex – or –  Why young babies are squirmy, grunty, gassy little people who are dramatic about their digestion

Most newborn gastrointestinal distress is caused by the sensations of motility, called the Gastrocolic Reflex, rather than gas. These peristaltic wave-like muscle contractions of the stomach and intestines propel stomach contents and stool through the small and large intestines. The gastrocolic reflex is triggered when your baby begins swallowing during a feeding and the stomach receives the milk. Inch by inch, the entire GI tract begins to wake up and contract, all the way from the stomach to the rectum. This is why babies may get squirmy or fussy 5 or 10 minutes into a feeding, and why feeding often prompts a bowel movement in a young baby.

Young babies are still getting used to the strange sensations (and products) of digestion, and aren’t shy about letting you know it. Once you see the “contents under pressure” explosion of poop some babies produce, it’s not surprising that they may react to the feeling of contents moving through their intestines at such high velocity with some distress.

Gentle Tummy Pressure can help: 

  1. Try laying your baby tummy-down across your lap, with her face turned to the side, so that her tummy is gently resting against your thigh. Pat or rub her back.
  2. Do you have a yoga/gym/physioball? Stabilize the ball and place a small receiving blanket over it, then carefully lay your baby tummy down over the ball on the blanket. Keep both hands on your baby, and rock your baby gently forward and back.
  3. The “colic hold” – drape your baby over your arm so that her face is supported by the inside of your bent elbow, and your hand is supporting her side and thigh between the legs. Her belly should be resting against your forearm. Gently press your arm, and baby, in towards your body, applying gentle tummy pressure, and either walk or sit on a physio ball and bounce.

Tummy massage for gas

  • Gently stroke your baby’s tummy from top to bottom using first one hand, then the other, like a waterwheel. Add your ‘whooshing” sounds.
  • Stroke from YOUR left to YOUR right – straight across, gentle but moderate pressure, just at or below the belly button.
  • Add the downward stroke, now moving across and down.
  • Flex baby at the hips and knees toward the tummy, gently press and hold in place, counting slowly to twenty. Repeat the entire sequence two or three times.

Many babies will pass gas during the exercise or have a BM a few minutes later – success and relief for everyone!

Is Burping Always Necessary?

I’m often asked about burping: when to try, how long to try, what if baby doesn’t burp?  Burping is optional, not mandatory every time for all babies, and your baby may or may not burp at any given session. Chances are, you’ll learn the ins and outs of your own baby soon, and will decide how important (or not) burping may be to your baby.

Though most young babies are “gassy” (ahem: Gassy Baby: Digestive Drama) this is only partially due to swallowed air that might come up with a burp. Much of the gas experienced (and passed) by infants is related to digestion and motility, rather than swallowed air. If you are trying for a burp for a minute or two with no luck, try another position (see below) or give up and continue with the feeding or next activity.

When breastfeeding, most babies don’t take in a lot of air (though some might, especially if there is a lot of on/off at the breast during feeding) and might not have a big burp to release. However, it’s worth trying for a burp most of the time. Sitting your baby up to burp after nursing on the first breast may help to rouse her for the second breast, helping her take in a little more milk. Then, burping after ending the feeding may help the milk to settle in her tummy and prevent extra spit up. Or not.

When bottle-feeding, it’s definitely a good idea to take a pause midway through the feeding for a burp, and at the end of the feeding as well. This helps to “pace” or slow down the bottle feeding, allows for additional interaction, and may help to reduce spit up.

Whether breastfeeding or bottle-feeding, use the baby’s natural pauses to time a burp break. Don’t pull away the nipple from a baby who is busy eating – she may protest, cry, and take in air, likely defeating your goal! Instead, when she begins to fall asleep, flutter-sucks with long pauses, or releases the nipple from her mouth, that’s a good time to try.

Try these favorite burping positions for newborns. In these positions, pat your baby’s back gently, or a little more firmly, or alternate pats and circle rubs on her back, while putting a little gentle pressure on baby’s tummy area.
And, baby may not burp – it’s ok!

  1. Resting with her tummy HIGH up on your shoulder (for gentle tummy pressure) with her head cuddled near your neck.
  2. Sitting upright (or slightly leaning forward) on your lap with her chin/cheeks supported in your hand. (this one is good for helping to rouse a sleepy baby)
  3. Laying tummy down over your lap with her face turned to the side.

A note about Spit Up:
Some babies tend to spit up a lot, with or without regular burping. If you have a spitter, you’ll know!
If your baby is a spitter, position a burp cloth, receiving blanket or small towel over your shoulder or lap when burping. It’s common for a mouthful (or more) of milk to come up with a burp, and this doesn’t mean your baby overfed. Expect to see more spit up, not less, by the 3rd or 4th month as baby is eating larger volumes and jiggling her body, arms and legs more.

Freaky Baby Things to Worry About

I spend so much of my time helping new parents understand and demystify normal baby behaviors to (hopefully) reduce their anxiety and concerns, while increasing parenting skills and confidence.  But just for fun, today I’ll just go ahead and scare you with a few freaky things that are serious enough to be real worries.

1. Hair Tourniquet.

A what? Yes, a Hair. Tourniquet. One of mom’s long hairs gets wrapped around baby’s finger or toe, cutting off circulation. (New moms – don’t be surprised when your hair begins mass shedding a few months after giving birth…) Baby’s finger gets swollen, cold and blue, but you can’t even see the culprit – the tightly wrapped hair – anymore because the finger swells around it, so parents usually have no idea why baby is screaming. Off to E.R. you go. The treatment? A nice dab of “NAIR” dissolves the hair quickly & safely without having to cut near baby’s swollen finger or toe.  If your baby is ever screaming inconsolably, after trying your usual approaches, take baby to the changing table and strip completely naked, then examine carefully, head to toe. Sometimes it’s as simple as a sharp corner of a diaper pressing into baby’s waist. But be sure to check those little fingers and toes for wrapped hair, and all the skin folds too.

2. Nail-Clipping Fail.

Nipping baby’s finger when clipping nails. Usually I’m all “Don’t worry about this; Don’t worry about that” so parents may be surprised when they tell me they nicked the baby’s finger and I’m not casual about it at all. A tiny cut at the tip of baby’s finger actually CAN be a big deal. Why? Baby fingers go everywhere and are very prone to infection. So keep your eyes on any cut around your baby’s finger or nail bed. Do warm soaks or compresses several times a day and watch the area closely.  If the fingertip becomes warm, pink or swollen and tight, call your pediatrician right away. This infection is called “Paronychia” and requires oral antibiotics to prevent a worsening infection. So if you have a little “oops” when clipping your baby’s nails, you don’t need to freak out, but do keep it clean and keep a close eye until it heals to make sure an infection isn’t setting in.

3. Febrile Seizures.

These are typically not serious in the big picture but can seriously freak out a new parent who has never encountered a febrile seizure before. Febrile seizures are most common in babies and toddlers between 9 months and 3 years.  Surprisingly, the seizure may occur at the very beginning of the fever when temperature is rising rapidly and may be the first sign of fever or illness in a toddler: a young child can go from playful to cranky to seizure in under an hour. It may be a relief to learn that febrile seizures are not related to epilepsy or lifelong seizure disorders. Keep your baby or toddler safe on a soft surface but put nothing in or near the mouth. Of course you’ll call your pediatrician after witnessing a febrile seizure, but these are usually able to be managed at home and are not a medical emergency. If the seizure is lasting more than 2 minutes, or if you are worried about your baby’s breathing, call 911.

4. Projectile Vomiting 3 times in a row.

Most babies spit up plenty, and many will randomly projectile vomit every once in a while just for kicks and giggles, but if the milk comes shooting back out quickly and with force after most feedings, that is different and concerning.  If a young baby projectile vomits 3 times  in a row,  call your pediatrician and pack your bags – you’ll be going to the hospital to have your baby evaluated for Pyloric Stenosis, a blockage between the stomach and the small intestine. This is more common in male babies, may be genetic, and most often occurs at around one month of age. Don’t worry about the rare, random projectile vomit episode, but if it’s frequent and persistent, call your doctor.

5. Nursemaid’s Elbow.

Radial head subluxation (official name, for medical-geeks) is a common injury in toddlers, caused by a simple tug, pull or jerk on the child’s arm. This can and does occur even during normal active physical play, like swinging a child by the arms for fun (not so fun in this case, and not recommended!) or if you quickly need to pull your toddler out of danger. Because infant and toddler joints are still quite loose, it’s relatively easy for the ligament to slip over the  radial head, making the elbow bone move out of place. Suspect a Nursemaid’s Elbow injury if you see that your toddler refuses to use one arm and keeps it tucked close to the body. There is usually no visible injury or swelling and very little pain as long as the arm is kept still.

I hope you’ll never need to know more about any of these issues, but at least this practical list of real-life concerns can take the place of Common Freaky Newborn Things Not To Worry About. You also may like to explore 12 Freaky Things You’ll Find in Baby’s Diaper During the 1st Year.